

Showing posts with label howto. Show all posts
Showing posts with label howto. Show all posts

Firefox browser looks better than IE .It loads faster than IE and have many plugins (add-ons) that enhance its functionality (Though IE also added some extra functionality in its 9 and later version) .
I am also using Firefox for surfing internet.From last few days I was getting some problem while using it.
My Firefox keeps on loading the page.Even welcome page was taking a long time to load.A circle in the tabs keeps on moving which shows that page is still loading.
Sometimes circle keeps on moving and i have to open a new blank tab.I was completely annoyed with this.I searched Mozilla forums and found this solution:-
1) Type about:config in the address bar and press the "Enter" key.
2) When you see a warning, click I'll be careful, I promise! button.
3) In the Filter bar, type network.http.max-connections
4) Right click the preference network.http.max-connections and choose Modify change the value to 30 or 48 click OK. (default value is 256)
5) Close the about:config tab and Restart Firefox.
Another alternate solution for this problem is to disable the extra addons and plugins that you have installed.
Follow these steps to remove/disable addons or plugins:-
1) Go to Add-ons Manager by clicking Add-ons from Tools menu.Alternatively you can use command ctrl+shift+A
2) Click on Disable button to disable the add-ons.You can uninstall these add-ons by clicking on Remove button.
3)You can also remove/disable extra plugins by selecting plugins from right sidebar.
After removing the extra add-ons/plugins , restart the Firefox.
Hope this solution will help you.If you have face same problem or still facing problem than please share it in comments
Gmail is the email service provided by Google.it was reported down few day before by a number of people.Google team invested the matter and sort out the problem.This service outage cause trouble for many people.If you are one of those people who suffered this service outage than you can easily overcome from this kind of problem next time by following the simple steps.You can also quickly access you gmail inbox by using these tips.:-
1) Try loading Gmail in simple HTML mode:-
Standard view of Gmail takes a lot time to load.You can switch to simple HTML mode of gmail.It loads faster and may help you in downtime.
2) Use Mobile Version of Gmail from your desktop:
Mobile version of any site loads faster.Same is the case with Gmail.You can access the mobile version of Gmail directly from your desktop by clicking here.
3) Using Safe mode:-
Another option is to go for safe mode.If you are a tech geek and are using gmail lab features than you might have observed that some of these features conflict with each other.You can disable these features and use safe mode of Gmail by clicking here.
4) Use iGoogle Gadget :-

You can add iGoogle gadget to get the email.It is a small version of Google's free Mail system, which previews your inbox.You can easily add it from here.
5) Get Gmail's Offline Access :-
Now you can get access to Gmail while you are offline.Though this method is not 100% perfect as it doesn't store all of your inbox emails but still you can get access to most of your emails while you are offline or gmail is down.
You can use these steps not only when gmail is down but also when you want faster access to gmail or your internet connection is slow. These steps helps to load your gmail account faster and you get quick access to your inbox.
1) Try loading Gmail in simple HTML mode:-
Standard view of Gmail takes a lot time to load.You can switch to simple HTML mode of gmail.It loads faster and may help you in downtime.
2) Use Mobile Version of Gmail from your desktop:
Mobile version of any site loads faster.Same is the case with Gmail.You can access the mobile version of Gmail directly from your desktop by clicking here.
3) Using Safe mode:-
Another option is to go for safe mode.If you are a tech geek and are using gmail lab features than you might have observed that some of these features conflict with each other.You can disable these features and use safe mode of Gmail by clicking here.
4) Use iGoogle Gadget :-
You can add iGoogle gadget to get the email.It is a small version of Google's free Mail system, which previews your inbox.You can easily add it from here.
5) Get Gmail's Offline Access :-
Now you can get access to Gmail while you are offline.Though this method is not 100% perfect as it doesn't store all of your inbox emails but still you can get access to most of your emails while you are offline or gmail is down.
You can use these steps not only when gmail is down but also when you want faster access to gmail or your internet connection is slow. These steps helps to load your gmail account faster and you get quick access to your inbox.
Easily Earn 200$ per Day Without spending a single penny
Posted by Unknown | | Category:
howto
|
0
comments

Companies like Google or Facebook earn BILLIONS OF $$$ every quarter,just because we, the Internet users use their services.It is time to understand, that we “the users” decide who is earning the big money.If we together decide to use the services of a company that shares profits with us,there is nothing that the other companies could do about it.It’s so easy: the more users that join the WAZZUB Family for free,the more money we “the users” will earn! Not only these two but many others like Yahoo, Bing are making a lot of money just because of us.These tech giants don't share their profit with the users surfing on these sites.But now there is a site wazzub.info which offers its users to share profit.All you need to do is to signup for a free account and refer your friends through your referral link to join the site.Sign up is free and is guaranteed to be free for always.
Here is a link to open a new account to wazzub.info
http://signup.wazzub.info
So its our time to join the site and refer as much as people we can. More the people we refer more is our earning. Facebook never shares its profit with its users than why not we join a network which is sharing its profit as well.Join it now before your friend refers this site to you.
Please note that this site is still not launched but you can join and refer friends.Here are wordings from site:-
"WAZZUB is in pre-launch until April 9, 2012. The more users that join our network through your personal link the more your $FACTOR will grow. Each new member 5 generations deep let your $FACTOR grow by 1. After launch we will pay 50% of WAZZUB's profits to our pre-launch members every month.
We simply divide the earnings through the total amount of $FACTORs of all members. Let us say for June the rate per $FACTOR is US$1.00 and your personal $FACTOR is 3905. That means we will pay you 3905 x 1.00 = US$3905.00!
"
Happy earning. Below is a Calulator which shows how much you can earn in a month


 | |
| Your number of invited members (Level 1) | |
| Their number of invited members (Level 2-5) | |
 
|
|
| Your potential monthly income | |
That's quite a bit trickier, or at least it used to be. There's a
nifty bookmarklet called DotEPUB that will convert whatever page you're
currently on into the widely used EPUB format. Here's how to use it:
- Point your browser to the DotEPUB page. (Note: the bookmarklet will not work using Internet Explorer, but is fine with Firefox, Chrome, Safari or Opera.)
- There
is only one setting--simplicity itself. Check or uncheck Immersive mode
on the right side of the page. If it's on, links, images, and videos
are stripped out entirely; if it's off, you will be warned that there
are images and asked if you want to strip them out.
 Step 2: Choose mode.
 - When you've decided, drag the DotEPUB logo from the top left onto your bookmark toolbar. If your browser doesn't support that or it doesn't seem to work for you, just click manual installation, then copy and paste the text into a new bookmark.
- You're all
set. The next time you're on a Web page you'd rather read later, just
click the bookmarklet and DotEPUB will convert it and save as an EPUB
file. Note that if you turned off Immersive mode, you will need to
decide whether or not to load images. This is not usually a good idea
unless they are charts or tables that are integral to understanding the
text.
If your primary e-reader is a Kindle, which doesn't support EPUB format, check out this workaround to convert EPUB files into formats compatible with Kindle.Step 4: Non-immersive mode warning.


It is very important to backup you system information.Whenever you install new software then there are chances of corrupting files.You are safe once you have taken backup.You can restore it whenever you find any problem with system files.Below are steps to back up system information in Windows 7 : -
1. Open the Control Panel, then click "System and Security," then "System," then "System protection" on the left.

2. A small window should pop up with the System Protection tab highlighted. Click "Create..." near the bottom.

3. Enter a label to help you remember which backup is which. Windows should now begin creating your restore point. It takes some time, especially if you've been using your computer for a while and installing lots of programs. After a bit, you should get a message informing you that the procedure competed successfully. 4. To restore your system, repeat step 1, then click "System Restore..." near the top of the pop-up. You'll be asked to select a restore point, and then Windows will roll you back to that time. This means any changes you made to your system, like installing software or changing settings, will be lost, so be careful!
1. Open the Control Panel, then click "System and Security," then "System," then "System protection" on the left.

2. A small window should pop up with the System Protection tab highlighted. Click "Create..." near the bottom.

3. Enter a label to help you remember which backup is which. Windows should now begin creating your restore point. It takes some time, especially if you've been using your computer for a while and installing lots of programs. After a bit, you should get a message informing you that the procedure competed successfully. 4. To restore your system, repeat step 1, then click "System Restore..." near the top of the pop-up. You'll be asked to select a restore point, and then Windows will roll you back to that time. This means any changes you made to your system, like installing software or changing settings, will be lost, so be careful!
GPRS Settings Of All Operators (India) For Data Cards
 Below is GPRS setting for all telecommunication operators in India.
GPRS SETTINGS OF Reliance
APN: rcomnet
Access Number: *99#
GPRS SETTINGS OF Aircel
APN: aircelgprs
Access Number: *99***1#
GPRS SETTINGS OF Idea
APN: internet
Access Number: *99#
GPRS SETTINGS OF Docomo
APN: TATA.DOCOMO.INTERNET
Access Number: *99#
GPRS SETTINGS OF Airtel
APN: airtelgprs.com
Access Number: *99#
GPRS SETTINGS OF BSNL 3G
APN: bsnlnet
Access Number: *99#
GPRS SETTINGS OF BSNL 2G
APN: bsnlnet
Access Number: *99#
GPRS SETTINGS OF MTNL 3G
Postpaid: APN: mtnl3g
Prepaid APN: pps3g
Access Number: *99#
GPRS SETTINGS OF Videocon
APN : vinternet.com
Access Number : *99#
GPRS SETTINGS OF Reliance
APN: rcomnet
Access Number: *99#
GPRS SETTINGS OF Aircel
APN: aircelgprs
Access Number: *99***1#
GPRS SETTINGS OF Idea
APN: internet
Access Number: *99#
GPRS SETTINGS OF Docomo
APN: TATA.DOCOMO.INTERNET
Access Number: *99#
GPRS SETTINGS OF Airtel
APN: airtelgprs.com
Access Number: *99#
GPRS SETTINGS OF BSNL 3G
APN: bsnlnet
Access Number: *99#
GPRS SETTINGS OF BSNL 2G
APN: bsnlnet
Access Number: *99#
GPRS SETTINGS OF MTNL 3G
Postpaid: APN: mtnl3g
Prepaid APN: pps3g
Access Number: *99#
GPRS SETTINGS OF Videocon
APN : vinternet.com
Access Number : *99#
Hostgator Hosting Services has announced Black Friday 2011 Special Offer and is offering 50% discount on its all hosting services.Hostgator has offered this service as Black Friday Promotion offer.

This promotion will bring our already competitive hosting packages as low as:
Go to Hostgator.com and purchase hosting now.
Be advised the promotion will begin just after midnight, Friday, November 25th, 2011 Central Standard Time (-6 GMT). The special offer will run until 11:59PM CST Friday, November 25th, 2011.
This promotion will bring our already competitive hosting packages as low as:
Shared hosting: As low as $4.95 Now only: $2.48/month (pre-paid)
Reseller Hosting: As low as $24.95 Now Only: $12.48/month (pre-paid)
VPS Hosting: As low as $19.95 Now Only: $9.98/month (First Month)
Dedicated Servers: As low as $174 Now Only $87/month (First Month)
This is an incredible deal and it will only run for 1 DAY!
Go to Hostgator.com and purchase hosting now.
Be advised the promotion will begin just after midnight, Friday, November 25th, 2011 Central Standard Time (-6 GMT). The special offer will run until 11:59PM CST Friday, November 25th, 2011.
How to Clean Your Computer's Registry
The Windows Registry is an enormous batch of files containing information about almost everything that occurs on the computer, from a visit to a Web site to a program installation. The registry also contains information about drivers and other essential programs, like DLLs -- small helper programs that often work with more than one application. This information is stored in the form of "keys" that help programs run. It's like a big blueprint for where everything goes on your computer and how it all fits together. Only computers running Windows operating systems have registries, and despite rumors to the contrary, Windows 7 will have a registry. A registry may have hundreds of thousands of entries, and new entries are created all the time. As it fills with information, the registry may cause a computer's performance to suffer. One problem is that Windows almost never removes registry entries, even if a program is uninstalled, as most uninstallers aren't able to effectively remove their own registry keys. And as files are moved around and programs are uninstalled, some registry keys point to programs or files that no longer exist or are located elsewhere. Fortunately, these errors don't have to be tolerated. The registry can be cleaned up, though not completely. And for your troubles, you may get better performance and decreased boot time. Some satisfied users report fewer instances of lag or Windows hanging (when the computer isn't responding). The exact performance boost varies depending on the state of the registry and the effectiveness of the cleaner program employed. You may also free up disk space, although most registry entries are very small. Registry cleaning is not without risks. This is a very sensitive area of your computer, and if you're happy with how your computer is running, don't go digging around. Trying to manually edit your registry can create errors in the registry that make it impossible to load Windows. Some registry-cleaning programs have been known to delete important registry keys or essential DLL files. And the performance improvements may be negligible, while running the program and approving each recommended deletion could take hours. In addition, reliable data on how registry cleaners affect performance are almost impossible to find. Most "performance tests" are actually produced by the developers of registry-cleaning tools. Despite these concerns, it is possible to clean out some of the registry's gunk, and your computer may be better off for it. On the next page, we'll take a look at how to go about this delicate job.
Hostgator Coupon Code 2012 for 25% OFF
It is a great news for you if you are planning to buy a hosting for your website.HostGator has released new coupon codes by using which you can get 25 percent discount on your new purchase of hosting.
Hostgator Coupon Code 2012 for 25% OFF is 2012giftcode
Just copy the code 2012giftcode and paste it into the coupon code text box at the time of purchase.That's it.
You can see a benefit of 25% in your shopping cart (billing).
So go to Hostgator and enjoy the new discount coupon.Hurry before the offer closes.

It is a great news for you if you are planning to buy a hosting for your website.HostGator has released new coupon codes by using which you can get 25 percent discount on your new purchase of hosting.
Hostgator Coupon Code 2012 for 25% OFF is 2012giftcode
Just copy the code 2012giftcode and paste it into the coupon code text box at the time of purchase.That's it.
You can see a benefit of 25% in your shopping cart (billing).
So go to Hostgator and enjoy the new discount coupon.Hurry before the offer closes.
Google search text box has a voice recognition feature which is very helpful for inputting long sentences and difficult words.
This feature can be brought to normal input textboxes also. But this feature works only in browsers which use the webkit rendering engine (ex: Google Chrome version 11 and above).
In order to add he voice input feature, the attribute
Below is the live example.
This feature can be brought to normal input textboxes also. But this feature works only in browsers which use the webkit rendering engine (ex: Google Chrome version 11 and above).
In order to add he voice input feature, the attribute
x-webkit-speech should be added to the input boxes.Example:
<input type="text" x-webkit-speech speech />
Below is the live example.

<script type="text/javascript">
function voiceInputOver(val){
alert("Voice input is complete");
alert("Your input is " + val);
}
</script>
<input onwebkitspeechchange="voiceInputOver(this.value)" x-webkit-speech />
Facebook Starts Video Calling
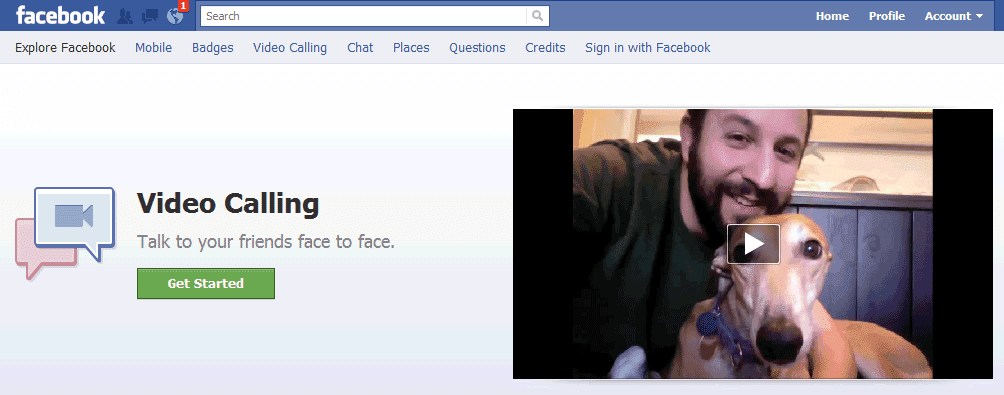
Facebook has started video calling.Facebook's CEO Mark Zuckerberg promised to give a surprise to Facebook users on 6th July.We predicted it before that it could be video calling with the help of Skype integration.
Now Mark Zuckerberg has officially announced the video calling feature available on Facebook.
How to make a Video Call in Facebook
Below are simple steps to make a video call on Facebook
1)The first time you try to video chat someone or answer a Video call, you will asked to download a program.
2)After the download is complete,install the program (It is Facebook Video call plugin installer)
3)The chat window will then ask you to select some Flash settings.
4)After that, the feature works like “a mini-Skype client”.(see the image above)
5)you can also record a video message if the person you’re calling doesn’t answer.
https://www.facebook.com/videocalling
Get Your Own Google+ Vanity URL

Google plus is launched and is available only by invitation.If you are invited to Google Plus and have created a account than you might have noticed that unlike Facebook and Twitter, Google+ doesn’t offer vanity URLs for user profiles
For example for Twitter our blog has following vanity URL
http://twitter.com/#!/theinfoground
Google uses a long string of numbers to denote users.This is used for security reasons so that spammers could not figure out your email address.
This string is helpful in saving your email ID from spammers on the other hand it creates difficulty for you to remember it or sharing it.You have to be carefull while typing or sharing this string with your friends to find your Google+ Profile.
Solution of this problem is Gplus.to. This simple little app lets you create a short URL for your Google+ page, making it easy to share with your friends.
Gplus.to fills a gap that Google+ doesn’t currently address. Should Google give users the ability to create vanity URLs, or is it too much of a privacy concern because of its connection to Gmail? Feel free to let us know in the comments.
Add Favicon to Blogger Blog
Bogger has introduced a new and easy way to add Favicon to your Blogger Blog.If you don't know about favicon than read this article about favicon.

In one of the old ways to add favicon you have to add some html code into your template in the head section.
<link rel="shortcut icon" type="image/x-icon" href="/favicon.ico">
It requires some html knowledge to add this code to your blogspot blog.
But now Blogger has create a simple way to add Favicon to your blog.You don't need any html knowledge.Just follow these simple steps to add favicon.
1)If you have created a favicon than proceed to step 2 otherwise click here to know how to create a new favicon online.
2) Once your favicon is created, Login into Blogger Draft.Remember this feature is not available in simple blogger login.Just click here to login into blogger draft.
3) After you are logged in ,click on Design in the top menu bar.You will see a new window with an option to add /edit favicon.(See image)

4)Click on edit and a pop up will open.Now add favicon generate in step first.
In this way you can easily add favicon to your blog with no Html Knowledge.This also helps to your website to stand distinctly among other bookmarks.
Bogger has introduced a new and easy way to add Favicon to your Blogger Blog.If you don't know about favicon than read this article about favicon.

In one of the old ways to add favicon you have to add some html code into your template in the head section.
<link rel="shortcut icon" type="image/x-icon" href="/favicon.ico">
It requires some html knowledge to add this code to your blogspot blog.
But now Blogger has create a simple way to add Favicon to your blog.You don't need any html knowledge.Just follow these simple steps to add favicon.
1)If you have created a favicon than proceed to step 2 otherwise click here to know how to create a new favicon online.
2) Once your favicon is created, Login into Blogger Draft.Remember this feature is not available in simple blogger login.Just click here to login into blogger draft.
3) After you are logged in ,click on Design in the top menu bar.You will see a new window with an option to add /edit favicon.(See image)
4)Click on edit and a pop up will open.Now add favicon generate in step first.
In this way you can easily add favicon to your blog with no Html Knowledge.This also helps to your website to stand distinctly among other bookmarks.
Do you know about favicon ? If you are a webdesigner or use internet frequently than you must be aware of favicon.Favicon is an icon of your website that is displayed with title in the titlebar and next to the URL in the browser.It is a small image file which has extension .ico .The size of favicon image is 32X32 pixel or 48X48 pixel. Favicon creates an identity of your Website among many bookmarks.For example whe you bookmark our blog,you will see following image with title/url :
There are some websites which helps you to generate Favicon for your website online.Below I have mentioned some of these websites.Checkout and create a new favion for your website online.
Dynamic Drive :
On this site you can create 32X32 pixel and 48X48 pixel size favicion.You need to upload a image of which you want favicon.It is simple to use and is popular one.
Favicon.cc
This site helps to create favicon with the help of image and you can also draw a new favicon by yourself.It provides an option for animated icon also.
Favicon generator
This site provide similar option as the favicon.cc site.Along with those 2 options it has a gallery of previoulsy created favicon.You can choose from them and save your time.
Related Reading : "How to add favicon to Blogger Blog"
There are some websites which helps you to generate Favicon for your website online.Below I have mentioned some of these websites.Checkout and create a new favion for your website online.
Dynamic Drive :
On this site you can create 32X32 pixel and 48X48 pixel size favicion.You need to upload a image of which you want favicon.It is simple to use and is popular one.
Favicon.cc
This site helps to create favicon with the help of image and you can also draw a new favicon by yourself.It provides an option for animated icon also.
Favicon generator
This site provide similar option as the favicon.cc site.Along with those 2 options it has a gallery of previoulsy created favicon.You can choose from them and save your time.
Related Reading : "How to add favicon to Blogger Blog"
How to Kill Rapidshare Waiting Time
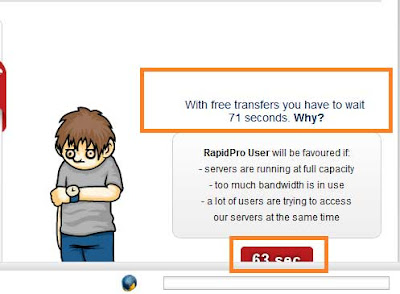
If you are a regular Internet user than you might know about RapidShare.Rapidshare is a file hosting service.You can upload your files to rapidshare hosting and provide a link for your users to download the file.
Downloading starts instantly if you are a premium user.You have to pay some money to become a RapidPro user.But if you don't have account on Rapidshare and are free user than you have to wait for sometime to download a file.
Nobody wants to wait.If you too want to save waiting time to download a file from rapidsahre than follow the steps written below and you don't have to wait any more to download a file.
Steps to avoid Rapidshare Waiting Time
First Way :
If you use FireFox browser than download Skip Screen.It is a free adddon of Mozilla.Install skip screen .It will skips unnecessary pages on sites like Rapidshare, Megaupload, zShare, Mediafire.
Second Way:
Click a Download link for Rapidshare and click on free download button.When timer starts type " javascript:alert(c=0)" in the address bar.A pop up will appear.Click OK.You are done.
Now you don’t have to wait to download your rapidshare file.

If you are a regular Internet user than you might know about RapidShare.Rapidshare is a file hosting service.You can upload your files to rapidshare hosting and provide a link for your users to download the file.
Downloading starts instantly if you are a premium user.You have to pay some money to become a RapidPro user.But if you don't have account on Rapidshare and are free user than you have to wait for sometime to download a file.
Nobody wants to wait.If you too want to save waiting time to download a file from rapidsahre than follow the steps written below and you don't have to wait any more to download a file.
Steps to avoid Rapidshare Waiting Time
First Way :
If you use FireFox browser than download Skip Screen.It is a free adddon of Mozilla.Install skip screen .It will skips unnecessary pages on sites like Rapidshare, Megaupload, zShare, Mediafire.
Second Way:
Click a Download link for Rapidshare and click on free download button.When timer starts type " javascript:alert(c=0)" in the address bar.A pop up will appear.Click OK.You are done.
Now you don’t have to wait to download your rapidshare file.
How to Import AIM Friends into Google Talk
 AIM has integrated its messenger service with Google talk.Now Google Talk and AIM have single login.This means you don't need to login separately in both accounts to talk with your friends.You can easily talk with your AIM friend on your Google talk id.You just need to import all your AIM buddies into Google Talk.
At the launch time of AIM and Google talk integration,there was no tool to automatically add AIM contact list to Google Talk.You have to manually add your AIM friends list to Google Talk.
But now AIM has provided a tool that will automatically imports your AIM's contact list into your Google talk.
This is just a two step process.Click on Import to Gmail.This page will ask you to login into your AIM account.
 After you logged into your AIM account,next step is to add your Google talk credentials.Add your Google Talk ID and password.After you added your, it will tell you when it is done.
For now you can import only 38 contacts.If the number of contacts in your AIM list is more than 38,than you have to add them manually.

At the launch time of AIM and Google talk integration,there was no tool to automatically add AIM contact list to Google Talk.You have to manually add your AIM friends list to Google Talk.
But now AIM has provided a tool that will automatically imports your AIM's contact list into your Google talk.
This is just a two step process.Click on Import to Gmail.This page will ask you to login into your AIM account.

For now you can import only 38 contacts.If the number of contacts in your AIM list is more than 38,than you have to add them manually.
How to Make Wordpress URLs SEO Friendly

WordPress is the most widely used CMS for blogging.If someone wants to run his/her own blog than WordPress is first choice.Reason is a number of available free templates, plugins and ease of use.Another reason to choose WordPress as blogging software is its easy search engine optimization(SEO).There are number of free plugin available for search engine optimization of your Wordpress Blog.
One of the basic step of Search Engine Optimization is to make SEO friendly URLs.By doing so we can increase the number of visitors to our blog.By default a wordpress create URLs like this :
To make WordPress URLs SEO friendly,Follow these steps :-

WordPress is the most widely used CMS for blogging.If someone wants to run his/her own blog than WordPress is first choice.Reason is a number of available free templates, plugins and ease of use.Another reason to choose WordPress as blogging software is its easy search engine optimization(SEO).There are number of free plugin available for search engine optimization of your Wordpress Blog.

One of the basic step of Search Engine Optimization is to make SEO friendly URLs.By doing so we can increase the number of visitors to our blog.By default a wordpress create URLs like this :
- http://www.yourwordpressblog.com/?p=1
To make WordPress URLs SEO friendly,Follow these steps :-
- 1) Login to your Wordpress Admin Panel
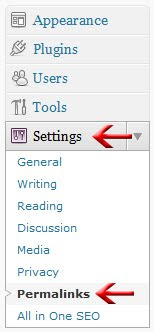
- 2) Click on "Settings" in the left pane of WordPress Blog Dashboard (See image on right side for reference).
- 3) Now click "Permalinks" under the "Setting" Menu (See image on right side for reference).
- 4) Now on right side under the "Common settings" in "Permalink Settings" page ,check the radio button next to "Custom Structure".Copy the code written in box below and paste it in the text box next to custom structure.
(See image below for reference). - 5) Save Changes

- http://www.yourwordpressblog.com/your-post-title
Why and How to Downgrade IE9 to IE8
 Yesterday I upgraded my Internet Explorer Browser from IE8 to IE9 version.I was hoping for more speed reliability and performance.But I was shocked to see when many websites didn't respond properly.I have BSNL broadband internet connection and often check my BSNL broadband usage on BSNL Web Portal.When I logged into my account the portal shows a warning message "Your web browser is not currently supported".I was worried.Than I tried to check other sites like admin section of my blog Information Ground.Statistics page of the admin section was not displaying properly.I got similar problem on many other websites so I decided to degrade the Internet Explorer 9 version to Internet explorer 8 version.
Below I have written the steps to degrade IE9 to IE8 for Windows Vista and Windows XP:-
Steps to Uninstall IE8 from Windows XP
1. From Windows,Go to Control Panel and open Add/Remove Programs application
2. Find and select Windows Internet Explorer 9 from the list of available applications.
3. Click the Remove button.
4. Restart your system.
Steps to Uninstall IE8 from Windows Vista
1. Click the Start Button and select Control Panel.
2. Select Programs (Programs and Features if you’re using the Classic View).
 3. Select View installed updates (it will be under the Tasks column if you’re using the Classic View).
4. Find and select Windows Internet Explorer 9 (IE9) from the list of available updates.
5. Click the Uninstall button at the top of the list.

6. Restart your system.

Below I have written the steps to degrade IE9 to IE8 for Windows Vista and Windows XP:-
Steps to Uninstall IE8 from Windows XP
1. From Windows,Go to Control Panel and open Add/Remove Programs application
2. Find and select Windows Internet Explorer 9 from the list of available applications.
3. Click the Remove button.
4. Restart your system.
Steps to Uninstall IE8 from Windows Vista
1. Click the Start Button and select Control Panel.
2. Select Programs (Programs and Features if you’re using the Classic View).

4. Find and select Windows Internet Explorer 9 (IE9) from the list of available updates.
5. Click the Uninstall button at the top of the list.

6. Restart your system.
If you are not satisfied with Internet Explorer 8 than you can uninstall that verision also.Steps to uninstall IE 8 are given here.
How To Restore Your Iphone to Factory Setting
 If your iPhone has become unresponsive, it is not working properly or it is not powering on than you can overcome this problem by resetting your iPhone or restoring iphone to factory setting.But keep in mind restoring iphone to factory setting will erase all user data like songs video images and even network setting.If you have unlocked your iphone than it might again get locked.
There are two types of resetting that you can do with your iphone : one is soft reset and second is hard reset.Follow these steps for soft reset of your iphone :
1.Press Sleep/Wake button on the top of your iphone.
2.Press and hold Sleep/Wake button for approximately 5 seconds until a slider with a red button appears at the top of the screen. It will say "slide to power off".
3. Move the slide to power off your iphone and wait until it is completely turned off.Now power on your iphone.This is soft reset for your iphone.
Steps to hard reset iphone :
1. Press and hold both the Sleep/Wake button and the Home button for about ten seconds.Continue to hold two buttons down together until the screen goes completely dark.
2.Now press Sleep/Wake button for approximately 5 seconds until the Apple logo appears on the screen.This way you can hard reset your iphone.
Watch Video About How To Hard Reset iPhone
How to restore iphone to original factory setting :
Instead of doing soft reset or hard reset of your iphone you can restore your iphone to original factory settings.But be cautious,it will delete all user data (music,images and video files) of your iphone.Better is to take backup of your iphone and than restore it to original factory setting.Backup will help to restore the iphone to same position in which it was before restoring.Follow these steps for factory setting of iphone:
You can restore your iphone to factory setting from inside your iphone.Below is a video which explain how to restore your phone to factory setting with your iphone.
Watch Video About How To Reset iPhone Back To Factory Settings Do you want to JAILBREAK Your Iphone ?If yes than here is a guide to JAILBREAK IPHONE (any model).

There are two types of resetting that you can do with your iphone : one is soft reset and second is hard reset.Follow these steps for soft reset of your iphone :
1.Press Sleep/Wake button on the top of your iphone.
2.Press and hold Sleep/Wake button for approximately 5 seconds until a slider with a red button appears at the top of the screen. It will say "slide to power off".
3. Move the slide to power off your iphone and wait until it is completely turned off.Now power on your iphone.This is soft reset for your iphone.
Do you want to JAILBREAK Your Iphone ?If yes than here is a guide to JAILBREAK IPHONE (any model).
Steps to hard reset iphone :
1. Press and hold both the Sleep/Wake button and the Home button for about ten seconds.Continue to hold two buttons down together until the screen goes completely dark.
2.Now press Sleep/Wake button for approximately 5 seconds until the Apple logo appears on the screen.This way you can hard reset your iphone.
Watch Video About How To Hard Reset iPhone
How to restore iphone to original factory setting :
Instead of doing soft reset or hard reset of your iphone you can restore your iphone to original factory settings.But be cautious,it will delete all user data (music,images and video files) of your iphone.Better is to take backup of your iphone and than restore it to original factory setting.Backup will help to restore the iphone to same position in which it was before restoring.Follow these steps for factory setting of iphone:
- Connect iPhone with itune installed on your computer.
- In iTunes click on your iphone and from the top menu select 'Summary' tab .
- Click on Restore.After clicking Restore, a pop up will open that will prompt you to choose if you are ready to restore your iPhone to factory settings.
- After confirming restore,following steps will be performed on your iphone : Extracting software, Verifying iPhone restore, Preparing iPhone for restore, Preparing iPhone for software restore, Restoring iPhone software, Verifying iPhone software, Verifying iPhone restore, Restoring iPhone firmware. Do not disconnect your iphone while the phone is in the process of restoring.
- A notification which will say, "iPhone has been restored to factory settings and is restarting", will appears to inform you that your iPhone has been restored to factory settings and is restarting. Click 'Ok'.
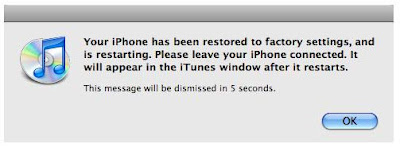
- After you click 'Ok', your phone will restart. The Apple logo will be displayed it will ask to connect to iTunes.Ignore this message and do not disconnect.Wait until it says "iphone is activated"

- Your iphone is restored to factory setting.


You can restore your iphone to factory setting from inside your iphone.Below is a video which explain how to restore your phone to factory setting with your iphone.
Watch Video About How To Reset iPhone Back To Factory Settings Do you want to JAILBREAK Your Iphone ?If yes than here is a guide to JAILBREAK IPHONE (any model).
How to Make Round Corners with CSS

If you have learned HTML and CSS than you know how much it is difficult ot make round corners with CSS.To make round corner with images is very boring task.One of the best ways to to create round corner box with css is to use a css code generator that will automatically generates the round corner css code for you.
CSS3 Generator can write custom CSS code for you and make it easy for you to generate the CSS for round corner box.
You can adjust the radius of corners(to make it more round),shadow and opacity.You can add gradient layout to the box.You can easily check the result in the preview box which helps you to design it as per your requirements.
Benefit of using CSS3 Generator are :
 I have designed a corner shown in the right hand side.CSS Code for this Round box corner is written below:-
-moz-border-radius:30px;
-webkit-border-radius:30px;
border-radius:30px;
Go to CSS3 Generator and design your Round Corner Box with CSS.

If you have learned HTML and CSS than you know how much it is difficult ot make round corners with CSS.To make round corner with images is very boring task.One of the best ways to to create round corner box with css is to use a css code generator that will automatically generates the round corner css code for you.
CSS3 Generator can write custom CSS code for you and make it easy for you to generate the CSS for round corner box.
You can adjust the radius of corners(to make it more round),shadow and opacity.You can add gradient layout to the box.You can easily check the result in the preview box which helps you to design it as per your requirements.
Benefit of using CSS3 Generator are :
- A user-friendly web service.
- Meant for web developers and graphics designers.
- Lets you create CSS gradients.
- Provides code for the created gradient.
- Lets you include or exclude support for Internet Explorer 7 and 8.
- Features not supported by Opera and Internet Explorer are indicated in the code.

-moz-border-radius:30px;
-webkit-border-radius:30px;
border-radius:30px;
Go to CSS3 Generator and design your Round Corner Box with CSS.
Subscribe to:
Posts (Atom)


